測試在開發過程中扮演至關重要的角色,確保軟體的可靠性和高品質。此原則適用於建置程式碼,包括 Gradle 外掛程式。
範例專案
本節圍繞一個名為「URL 驗證器外掛程式」的範例專案。此外掛程式建立一個名為 verifyUrl 的任務,用於檢查是否可以透過 HTTP GET 解析給定的 URL。終端使用者可以透過名為 verification 的擴充功能提供 URL。
以下建置腳本假設外掛程式 JAR 檔案已發布到二進制儲存庫。此腳本示範如何將外掛程式套用至專案並配置其公開的擴充功能
plugins {
    id("org.myorg.url-verifier")        (1)
}

verification {
    url = "https://www.google.com/"  (2)
}plugins {
id 'org.myorg.url-verifier' (1)
}
verification {
url = 'https://www.google.com/' (2)
}| 1 | 將外掛程式套用至專案 |
| 2 | 透過公開的擴充功能配置要驗證的 URL |
如果對配置的 URL 進行 HTTP GET 呼叫後傳回 200 回應代碼,則執行 verifyUrl 任務會呈現成功訊息
$ gradle verifyUrl

> Task :verifyUrl
Successfully resolved URL 'https://www.google.com/'

BUILD SUCCESSFUL in 0s
5 actionable tasks: 5 executed
在深入研究程式碼之前,我們先回顧不同類型的測試以及支援實作這些測試的工具。
測試的重要性
測試是軟體開發生命週期的重要組成部分,可確保軟體功能正確,並在發布前符合品質標準。自動化測試讓開發人員能夠更有信心地重構和改進程式碼。
測試金字塔
- 手動測試
-
雖然手動測試很直接,但容易出錯且需要人工。對於 Gradle 外掛程式,手動測試涉及在建置腳本中使用外掛程式。
- 自動化測試
-
自動化測試包括單元、整合和功能測試。
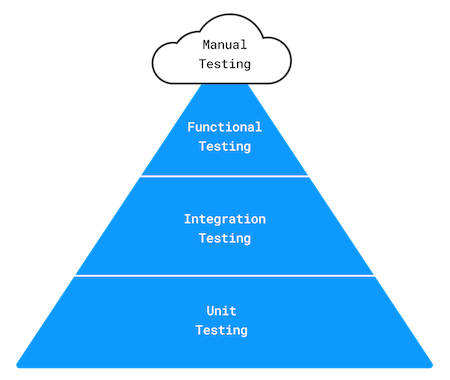
Mike Cohen 在其著作 Succeeding with Agile: Software Development Using Scrum 中介紹的測試金字塔描述了三種自動化測試
-
單元測試: 隔離驗證最小的程式碼單元(通常是方法)。它使用 Stub 或 Mock 將程式碼與外部相依性隔離。
-
整合測試: 驗證多個單元或組件協同工作。
-
功能測試: 從終端使用者的角度測試系統,確保功能正確。Gradle 外掛程式的端對端測試模擬建置、套用外掛程式並執行特定任務以驗證功能。
工具支援
使用適當的工具可以簡化 Gradle 外掛程式的手動和自動測試。下表總結了每種測試方法。您可以選擇任何您覺得舒適的測試框架。
如需詳細說明和程式碼範例,請參閱以下特定章節
| 測試類型 | 工具支援 |
|---|---|
任何基於 JVM 的測試框架 |
|
任何基於 JVM 的測試框架 |
|
任何基於 JVM 的測試框架和 Gradle TestKit |
設定手動測試
Gradle 的 複合建置 功能讓手動測試外掛程式變得容易。獨立的外掛程式專案和消費專案可以合併為一個單元,從而輕鬆試用或除錯變更,而無需重新發布二進制檔案
.
├── include-plugin-build   (1)
│   ├── build.gradle
│   └── settings.gradle
└── url-verifier-plugin    (2)
    ├── build.gradle
    ├── settings.gradle
    └── src
| 1 | 包含外掛程式專案的消費專案 |
| 2 | 外掛程式專案 |
有兩種方法可以在消費專案中包含外掛程式專案
-
透過使用命令列選項
--include-build。 -
透過在
settings.gradle中使用方法includeBuild。
以下程式碼片段示範了設定檔的使用
pluginManagement {
    includeBuild("../url-verifier-plugin")
}pluginManagement {
includeBuild '../url-verifier-plugin'
}來自專案 include-plugin-build 的 verifyUrl 任務的命令列輸出 看起來與簡介中顯示的完全相同,只是現在它作為複合建置的一部分執行。
手動測試在開發過程中佔有一席之地,但它不能取代自動化測試。
設定自動化測試
儘早設定一組測試對於外掛程式的成功至關重要。當將外掛程式升級到新的 Gradle 版本或增強/重構程式碼時,自動化測試將成為寶貴的安全網。
組織測試原始碼
我們建議實作良好的單元、整合和功能測試分佈,以涵蓋最重要的使用案例。分隔每種測試類型的原始碼會自動產生更易於維護和管理的專案。
預設情況下,Java 專案會建立一個慣例,用於在目錄 src/test/java 中組織單元測試。此外,如果您套用 Groovy 外掛程式,則會考慮目錄 src/test/groovy 下的原始碼進行編譯(Kotlin 的標準相同,位於目錄 src/test/kotlin 下)。因此,其他測試類型的原始碼目錄應遵循類似的模式
.
└── src
    ├── functionalTest
    │   └── groovy      (1)
    ├── integrationTest
    │   └── groovy      (2)
    ├── main
    │   ├── java        (3)
    └── test
        └── groovy      (4)
| 1 | 包含功能測試的原始碼目錄 |
| 2 | 包含整合測試的原始碼目錄 |
| 3 | 包含生產原始碼的原始碼目錄 |
| 4 | 包含單元測試的原始碼目錄 |
目錄 src/integrationTest/groovy 和 src/functionalTest/groovy 並非基於 Gradle 專案的現有標準慣例。您可以自由選擇最適合您的專案佈局。 |
您可以配置原始碼目錄以進行編譯和測試執行。
Test Suite 外掛程式 提供 DSL 和 API,用於將多個自動化測試群組建模到基於 JVM 的專案中的測試套件中。您也可以依賴協力廠商外掛程式來獲得便利,例如 Nebula Facet 外掛程式 或 TestSets 外掛程式。
建模測試類型
透過孵化中的 JVM Test Suite 外掛程式,可以使用新的配置 DSL 來建模以下 integrationTest 套件。 |
在 Gradle 中,原始碼目錄使用 原始碼集 的概念表示。原始碼集配置為指向一個或多個包含原始碼的目錄。當您定義原始碼集時,Gradle 會自動為指定的目錄設定編譯任務。
可以使用一行建置腳本程式碼建立預先配置的原始碼集。原始碼集會自動註冊配置,以定義原始碼集來源的相依性
// Define a source set named 'test' for test sources
sourceSets {
    test {
        java {
            srcDirs = ['src/test/java']
        }
    }
}
// Specify a test implementation dependency on JUnit
dependencies {
    testImplementation 'junit:junit:4.12'
}
我們使用它來為專案本身定義 integrationTestImplementation 相依性,它代表我們專案的「主要」變體(即,編譯的外掛程式程式碼)
val integrationTest by sourceSets.creating

dependencies {
    "integrationTestImplementation"(project)
}def integrationTest = sourceSets.create("integrationTest")
dependencies {
integrationTestImplementation(project)
}原始碼集負責編譯原始碼,但不處理位元組碼的執行。對於測試執行,需要建立類型為 Test 的對應任務。以下設定顯示了整合測試的執行,參考了整合測試原始碼集的類別和執行階段類別路徑
val integrationTestTask = tasks.register<Test>("integrationTest") {
    description = "Runs the integration tests."
    group = "verification"
    testClassesDirs = integrationTest.output.classesDirs
    classpath = integrationTest.runtimeClasspath
    mustRunAfter(tasks.test)
}
tasks.check {
    dependsOn(integrationTestTask)
}def integrationTestTask = tasks.register("integrationTest", Test) {
description = 'Runs the integration tests.'
group = "verification"
testClassesDirs = integrationTest.output.classesDirs
classpath = integrationTest.runtimeClasspath
mustRunAfter(tasks.named('test'))
}
tasks.named('check') {
dependsOn(integrationTestTask)
}配置測試框架
以下程式碼片段顯示如何使用 Spock 實作測試
repositories {
    mavenCentral()
}

dependencies {
    testImplementation(platform("org.spockframework:spock-bom:2.2-groovy-3.0"))
    testImplementation("org.spockframework:spock-core")
    testRuntimeOnly("org.junit.platform:junit-platform-launcher")

    "integrationTestImplementation"(platform("org.spockframework:spock-bom:2.2-groovy-3.0"))
    "integrationTestImplementation"("org.spockframework:spock-core")
    "integrationTestRuntimeOnly"("org.junit.platform:junit-platform-launcher")

    "functionalTestImplementation"(platform("org.spockframework:spock-bom:2.2-groovy-3.0"))
    "functionalTestImplementation"("org.spockframework:spock-core")
    "functionalTestRuntimeOnly"("org.junit.platform:junit-platform-launcher")
}

tasks.withType<Test>().configureEach {
    // Using JUnitPlatform for running tests
    useJUnitPlatform()
}repositories {
mavenCentral()
}
dependencies {
testImplementation platform("org.spockframework:spock-bom:2.2-groovy-3.0")
testImplementation 'org.spockframework:spock-core'
testRuntimeOnly 'org.junit.platform:junit-platform-launcher'
integrationTestImplementation platform("org.spockframework:spock-bom:2.2-groovy-3.0")
integrationTestImplementation 'org.spockframework:spock-core'
integrationTestRuntimeOnly 'org.junit.platform:junit-platform-launcher'
functionalTestImplementation platform("org.spockframework:spock-bom:2.2-groovy-3.0")
functionalTestImplementation 'org.spockframework:spock-core'
functionalTestRuntimeOnly 'org.junit.platform:junit-platform-launcher'
}
tasks.withType(Test).configureEach {
// Using JUnitPlatform for running tests
useJUnitPlatform()
}| Spock 是一個基於 Groovy 的 BDD 測試框架,甚至包含用於建立 Stub 和 Mock 的 API。Gradle 團隊因 Spock 的表達力和簡潔性而偏好它勝過其他選項。 |
實作自動化測試
本節討論單元、整合和功能測試的代表性實作範例。所有測試類別均基於 Spock 的使用,儘管將程式碼調整為不同的測試框架應該相對容易。
實作單元測試
URL 驗證器外掛程式發出 HTTP GET 呼叫,以檢查 URL 是否可以成功解析。方法 DefaultHttpCaller.get(String) 負責呼叫給定的 URL,並傳回類型為 HttpResponse 的執行個體。HttpResponse 是一個 POJO,包含有關 HTTP 回應代碼和訊息的資訊
package org.myorg.http;

public class HttpResponse {
    private int code;
    private String message;

    public HttpResponse(int code, String message) {
        this.code = code;
        this.message = message;
    }

    public int getCode() {
        return code;
    }

    public String getMessage() {
        return message;
    }

    @Override
    public String toString() {
        return "HTTP " + code + ", Reason: " + message;
    }
}
類別 HttpResponse 是單元測試的良好候選者。它不會接觸任何其他類別,也不會使用 Gradle API。
package org.myorg.http

import spock.lang.Specification

class HttpResponseTest extends Specification {

    private static final int OK_HTTP_CODE = 200
    private static final String OK_HTTP_MESSAGE = 'OK'

    def "can access information"() {
        when:
        def httpResponse = new HttpResponse(OK_HTTP_CODE, OK_HTTP_MESSAGE)

        then:
        httpResponse.code == OK_HTTP_CODE
        httpResponse.message == OK_HTTP_MESSAGE
    }

    def "can get String representation"() {
        when:
        def httpResponse = new HttpResponse(OK_HTTP_CODE, OK_HTTP_MESSAGE)

        then:
        httpResponse.toString() == "HTTP $OK_HTTP_CODE, Reason: $OK_HTTP_MESSAGE"
    }
}| 編寫單元測試時,測試邊界條件和各種形式的無效輸入非常重要。盡可能從使用 Gradle API 的類別中提取邏輯,使其可以作為單元測試進行測試。這將產生可維護的程式碼和更快的測試執行。 |
您可以使用 ProjectBuilder 類別來建立 Project 執行個體,以便在測試外掛程式實作時使用。
public class GreetingPluginTest {
    @Test
    public void greeterPluginAddsGreetingTaskToProject() {
        Project project = ProjectBuilder.builder().build();
        project.getPluginManager().apply("org.example.greeting");

        assertTrue(project.getTasks().getByName("hello") instanceof GreetingTask);
    }
}
實作整合測試
讓我們看一下接觸另一個系統的類別,即發出 HTTP 呼叫的程式碼片段。在執行類別 DefaultHttpCaller 的測試時,執行階段環境需要能夠接觸網際網路
package org.myorg.http;

import java.io.IOException;
import java.net.HttpURLConnection;
import java.net.URI;
import java.net.URISyntaxException;

public class DefaultHttpCaller implements HttpCaller {
    @Override
    public HttpResponse get(String url) {
        try {
            HttpURLConnection connection = (HttpURLConnection) new URI(url).toURL().openConnection();
            connection.setConnectTimeout(5000);
            connection.setRequestMethod("GET");
            connection.connect();

            int code = connection.getResponseCode();
            String message = connection.getResponseMessage();
            return new HttpResponse(code, message);
        } catch (IOException e) {
            throw new HttpCallException(String.format("Failed to call URL '%s' via HTTP GET", url), e);
        } catch (URISyntaxException e) {
            throw new RuntimeException(e);
        }
    }
}
為 DefaultHttpCaller 實作整合測試與上一節中顯示的單元測試沒有太大區別
package org.myorg.http

import spock.lang.Specification
import spock.lang.Subject

class DefaultHttpCallerIntegrationTest extends Specification {
    @Subject HttpCaller httpCaller = new DefaultHttpCaller()

    def "can make successful HTTP GET call"() {
        when:
        def httpResponse = httpCaller.get('https://www.google.com/')

        then:
        httpResponse.code == 200
        httpResponse.message == 'OK'
    }

    def "throws exception when calling unknown host via HTTP GET"() {
        when:
        httpCaller.get('https://www.wedonotknowyou123.com/')

        then:
        def t = thrown(HttpCallException)
        t.message == "Failed to call URL 'https://www.wedonotknowyou123.com/' via HTTP GET"
        t.cause instanceof UnknownHostException
    }
}
實作功能測試
功能測試驗證外掛程式端對端是否正確。實際上,這表示套用、配置和執行外掛程式實作的功能。UrlVerifierPlugin 類別公開一個擴充功能和一個任務執行個體,該執行個體使用終端使用者配置的 URL 值
package org.myorg;

import org.gradle.api.Plugin;
import org.gradle.api.Project;
import org.myorg.tasks.UrlVerify;

public class UrlVerifierPlugin implements Plugin<Project> {
    @Override
    public void apply(Project project) {
        UrlVerifierExtension extension = project.getExtensions().create("verification", UrlVerifierExtension.class);
        UrlVerify verifyUrlTask = project.getTasks().create("verifyUrl", UrlVerify.class);
        verifyUrlTask.getUrl().set(extension.getUrl());
    }
}
每個 Gradle 外掛程式專案都應套用 外掛程式開發外掛程式,以減少樣板程式碼。透過套用外掛程式開發外掛程式,測試原始碼集已針對與 TestKit 一起使用進行預先配置。如果我們想要將自訂原始碼集用於功能測試,並將預設測試原始碼集僅用於單元測試,我們可以配置外掛程式開發外掛程式以在其他位置尋找 TestKit 測試。
gradlePlugin {
    testSourceSets(functionalTest)
}gradlePlugin {
testSourceSets(sourceSets.functionalTest)
}Gradle 外掛程式的功能測試使用 GradleRunner 的執行個體來執行受測建置。GradleRunner 是 TestKit 提供的 API,它在內部使用 Tooling API 來執行建置。
以下範例將外掛程式套用至受測建置腳本、配置擴充功能並使用任務 verifyUrl 執行建置。請參閱 TestKit 文件,以更熟悉 TestKit 的功能。
package org.myorg

import org.gradle.testkit.runner.GradleRunner
import spock.lang.Specification
import spock.lang.TempDir

import static org.gradle.testkit.runner.TaskOutcome.SUCCESS

class UrlVerifierPluginFunctionalTest extends Specification {
    @TempDir File testProjectDir
    File buildFile

    def setup() {
        buildFile = new File(testProjectDir, 'build.gradle')
        buildFile << """
            plugins {
                id 'org.myorg.url-verifier'
            }
        """
    }

    def "can successfully configure URL through extension and verify it"() {
        buildFile << """
            verification {
                url = 'https://www.google.com/'
            }
        """

        when:
        def result = GradleRunner.create()
            .withProjectDir(testProjectDir)
            .withArguments('verifyUrl')
            .withPluginClasspath()
            .build()

        then:
        result.output.contains("Successfully resolved URL 'https://www.google.com/'")
        result.task(":verifyUrl").outcome == SUCCESS
    }
}
IDE 整合
TestKit 透過執行特定的 Gradle 任務來判斷外掛程式類別路徑。您需要執行 assemble 任務以初始產生外掛程式類別路徑,或反映對其的變更,即使從 IDE 執行基於 TestKit 的功能測試時也是如此。
某些 IDE 提供了一個便利選項,可將「測試類別路徑產生和執行」委派給建置。在 IntelliJ 中,您可以在「偏好設定…」>「建置、執行、部署」>「建置工具」>「Gradle」>「執行器」>「將 IDE 建置/執行動作委派給 Gradle」下找到此選項。
