建置原生軟體
功能
原生軟體外掛提供
-
支援在 Windows、Linux、macOS 和其他平台上建置原生程式庫和應用程式。
-
支援多種原始碼語言。
-
支援為不同的架構、作業系統或任何目的建置相同軟體的不同變體。
-
增量平行編譯、預編譯標頭。
-
原生軟體元件之間的相依性管理。
-
單元測試執行。
-
產生 Visual Studio 解決方案和專案檔。
-
與各種工具鏈深度整合,包括探索已安裝的工具鏈。
支援的語言
目前支援以下原始碼語言
-
C
-
C++
-
Objective-C
-
Objective-C++
-
組合語言
-
Windows 資源
工具鏈支援
Gradle 提供了使用不同工具鏈執行相同建置的能力。當您建置原生二進制檔時,Gradle 將嘗試在您的機器上找到可以建置該二進制檔的工具鏈。您可以微調這項工作的確切方式,詳情請參閱 工具鏈支援。
支援以下工具鏈
| 作業系統 | 工具鏈 | 注意事項 |
|---|---|---|
Linux |
||
Linux |
||
macOS |
XCode |
使用與 XCode 捆綁的 Clang 工具鏈。 |
Windows |
Windows XP 及更高版本,Visual C++ 2010/2012/2013/2015/2017/2019。 |
|
Windows |
Windows XP 及更高版本。 |
|
Windows |
Windows XP 及更高版本。 |
以下工具鏈為非官方支援。它們通常運作良好,但未經過持續測試
| 作業系統 | 工具鏈 | 注意事項 |
|---|---|---|
macOS |
GCC 來自 Macports |
|
macOS |
Clang 來自 Macports |
|
類 UNIX |
||
類 UNIX |
工具鏈安裝
| 請注意,如果您使用的是 GCC,即使您不是從 C++ 原始碼建置,目前也需要安裝 C++ 支援。此限制將在未來的 Gradle 版本中移除。 |
若要建置原生軟體,您需要安裝相容的工具鏈
Windows
若要在 Windows 上建置,請安裝相容版本的 Visual Studio。原生外掛將探索 Visual Studio 安裝並選擇最新版本。無需處理環境變數或批次腳本。這在 Cygwin shell 或 Windows 命令列中都能正常運作。
或者,您可以安裝帶有 GCC 或 MinGW 的 Cygwin。目前不支援 Clang。
macOS
若要在 macOS 上建置,您應安裝 XCode。原生外掛將使用系統 PATH 探索 XCode 安裝。
原生外掛也適用於與 Macports 捆綁的 GCC 和 Clang。若要使用其中一個 Macports 工具鏈,您需要使用 port select 命令將該工具鏈設為預設值,並將 Macports 新增至系統 PATH。
Linux
若要在 Linux 上建置,請安裝相容版本的 GCC 或 Clang。原生外掛將使用系統 PATH 探索 GCC 或 Clang。
原生軟體模型
原生軟體模型建立在基礎 Gradle 軟體模型之上。
若要使用 Gradle 建置原生軟體,您的專案應定義一或多個原生元件。每個元件代表 Gradle 應建置的可執行檔或程式庫。一個專案可以定義任意數量的元件。Gradle 預設不定義任何元件。
對於每個元件,Gradle 為元件可以從中建置的每種語言定義一個原始碼集。原始碼集本質上只是一組包含原始碼檔案的原始碼目錄。例如,當您應用 c 外掛並定義一個名為 helloworld 的程式庫時,Gradle 預設將定義一個原始碼集,其中包含 src/helloworld/c 目錄中的 C 原始碼檔案。它將使用這些原始碼檔案來建置 helloworld 程式庫。以下將更詳細地說明。
對於每個元件,Gradle 定義一或多個二進制檔作為輸出。若要建置二進制檔,Gradle 將採用為元件定義的原始碼檔案,根據原始碼語言適當地編譯它們,並將結果連結到二進制檔中。對於可執行元件,Gradle 可以產生可執行二進制檔。對於程式庫元件,Gradle 可以同時產生靜態和共享程式庫二進制檔。例如,當您定義一個名為 helloworld 的程式庫並在 Linux 上建置時,Gradle 預設將產生 libhelloworld.so 和 libhelloworld.a 二進制檔。
在許多情況下,可以為一個元件產生多個二進制檔。這些二進制檔可能因用於建置的工具鏈、提供的編譯器/連結器旗標、提供的相依性或提供的其他原始碼檔案而異。為元件產生的每個原生二進制檔都稱為變體。二進制變體將在下面詳細討論。
平行編譯
Gradle 預設使用單一建置工作執行緒池來同時編譯和連結原生元件。無需特殊配置即可啟用並行建置。
預設情況下,工作執行緒池大小由建置機器上可用的處理器數量決定(如報告給建置 JVM)。若要明確設定工作執行緒的數量,請使用 --max-workers 命令列選項或 org.gradle.workers.max 系統屬性。通常無需將此設定從其預設值變更。
建置工作執行緒池在所有建置工作之間共享。這表示當使用 平行專案執行 時,並行個別編譯操作的最大數量不會增加。例如,如果建置機器有 4 個處理核心,並且有 10 個專案平行編譯,Gradle 將僅使用 4 個工作執行緒,而不是 40 個。
建置程式庫
若要建置靜態或共享原生程式庫,您可以在 components 容器中定義一個程式庫元件。以下範例定義一個名為 hello 的程式庫
範例:定義程式庫元件
model {
    components {
        hello(NativeLibrarySpec)
    }
}
程式庫元件使用 NativeLibrarySpec 表示。每個程式庫元件可以產生至少一個共享程式庫二進制檔 (SharedLibraryBinarySpec) 和至少一個靜態程式庫二進制檔 (StaticLibraryBinarySpec)。
建置可執行檔
若要建置原生可執行檔,您可以在 components 容器中定義一個可執行元件。以下範例定義一個名為 main 的可執行檔
範例:定義可執行元件
model {
    components {
        main(NativeExecutableSpec) {
            sources {
               c.lib library: "hello"
            }
        }
    }
}
可執行元件使用 NativeExecutableSpec 表示。每個可執行元件可以產生至少一個可執行二進制檔 (NativeExecutableBinarySpec)。
對於定義的每個元件,Gradle 都會新增一個具有相同名稱的 FunctionalSourceSet。這些功能原始碼集中的每一個都將包含一個特定於語言的原始碼集,用於專案支援的每種語言。
組裝或建置相依項
有時,您可能需要組裝(編譯和連結)或建置(編譯、連結和測試)元件或二進制檔及其相依項(取決於元件或二進制檔的事物)。原生軟體模型提供啟用此功能的工作。首先,相依元件報告提供了關於每個元件之間關係的洞察。其次,建置和組裝相依項工作允許您一步組裝或建置元件及其相依項。
在以下範例中,建置檔將 OpenSSL 定義為 libUtil 的相依項,將 libUtil 定義為 LinuxApp 和 WindowsApp 的相依項。測試套件的處理方式類似。相依項可以被認為是反向相依性。
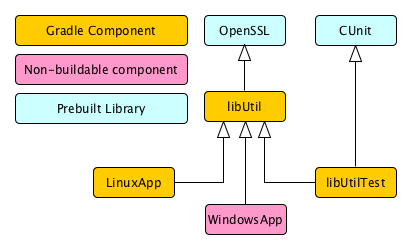
透過反向追蹤相依性,您可以看到 LinuxApp 和 WindowsApp 是 libUtil 的相依項。當 libUtil 變更時,Gradle 將需要重新編譯或重新連結 LinuxApp 和 WindowsApp。 |
當您組裝元件的相依項時,元件及其所有相依項都會被編譯和連結,包括任何測試套件二進制檔。Gradle 的最新檢查用於僅在發生變更時才編譯或連結。例如,如果您已變更原始碼檔案,但變更方式不會影響專案的標頭,Gradle 將能夠跳過相依元件的編譯,而只需要使用新的程式庫重新連結。組裝元件時不會執行測試。
當您建置元件的相依項時,元件及其所有相依二進制檔都會被編譯、連結和檢查。檢查元件表示執行任何 檢查工作,包括執行任何測試套件,因此在建置元件時會執行測試。
在以下章節中,我們將使用包含 CUnit 測試套件的範例建置,示範 assembleDependents*、buildDependents* 和 dependentComponents 工作的使用方式。範例的建置腳本如下
範例:範例建置
plugins {
    id 'c'
    id 'cunit-test-suite'
}

model {
    flavors {
        passing
        failing
    }
    platforms {
        x86 {
            if (operatingSystem.macOsX) {
                architecture "x64"
            } else {
                architecture "x86"
            }
        }
    }
    components {
        operators(NativeLibrarySpec) {
            targetPlatform "x86"
        }
    }
    testSuites {
        operatorsTest(CUnitTestSuiteSpec) {
            testing $.components.operators
        }
    }
}
相依元件報告
Gradle 提供了一個報告,您可以從命令列執行該報告,以顯示專案中元件的圖形以及取決於這些元件的元件。以下是在範例專案上執行 gradle dependentComponents 的範例
範例:相依元件報告
gradle dependentComponents 的輸出> gradle dependentComponents > Task :dependentComponents ------------------------------------------------------------ Root project 'cunit' ------------------------------------------------------------ operators - Components that depend on native library 'operators' +--- operators:failingSharedLibrary +--- operators:failingStaticLibrary +--- operators:passingSharedLibrary \--- operators:passingStaticLibrary Some test suites were not shown, use --test-suites or --all to show them. BUILD SUCCESSFUL in 0s 1 actionable task: 1 executed
| 有關更多詳細資訊,請參閱 DependentComponentsReport API 文件。 |
預設情況下,不可建置的二進制檔和測試套件會從報告中隱藏。dependentComponents 工作提供選項,可讓您使用 --all 選項查看所有相依項
範例:相依元件報告
gradle dependentComponents --all 的輸出> gradle dependentComponents --all
> Task :dependentComponents
------------------------------------------------------------
Root project 'cunit'
------------------------------------------------------------
operators - Components that depend on native library 'operators'
+--- operators:failingSharedLibrary
+--- operators:failingStaticLibrary
| \--- operatorsTest:failingCUnitExe (t)
+--- operators:passingSharedLibrary
\--- operators:passingStaticLibrary
\--- operatorsTest:passingCUnitExe (t)
operatorsTest - Components that depend on Cunit test suite 'operatorsTest'
+--- operatorsTest:failingCUnitExe (t)
\--- operatorsTest:passingCUnitExe (t)
(t) - Test suite binary
BUILD SUCCESSFUL in 0s
1 actionable task: 1 executed
以下是 operators 元件的對應報告,顯示其所有二進制檔的相依項
範例:取決於 operators 元件的元件報告
gradle dependentComponents --component operators 的輸出> gradle dependentComponents --component operators > Task :dependentComponents ------------------------------------------------------------ Root project 'cunit' ------------------------------------------------------------ operators - Components that depend on native library 'operators' +--- operators:failingSharedLibrary +--- operators:failingStaticLibrary +--- operators:passingSharedLibrary \--- operators:passingStaticLibrary Some test suites were not shown, use --test-suites or --all to show them. BUILD SUCCESSFUL in 0s 1 actionable task: 1 executed
以下是 operators 元件的對應報告,顯示其所有二進制檔(包括測試套件)的相依項
範例:取決於 operators 元件的元件報告,包括測試套件
gradle dependentComponents --test-suites --component operators 的輸出> gradle dependentComponents --test-suites --component operators
> Task :dependentComponents
------------------------------------------------------------
Root project 'cunit'
------------------------------------------------------------
operators - Components that depend on native library 'operators'
+--- operators:failingSharedLibrary
+--- operators:failingStaticLibrary
| \--- operatorsTest:failingCUnitExe (t)
+--- operators:passingSharedLibrary
\--- operators:passingStaticLibrary
\--- operatorsTest:passingCUnitExe (t)
(t) - Test suite binary
BUILD SUCCESSFUL in 0s
1 actionable task: 1 executed
此外,--non-binaries 選項會在報告中顯示不可建置的二進制檔,--no-non-buildable 選項會隱藏它們。同樣地,--test-suites 選項會顯示測試套件,而 --no-test-suites 選項會隱藏它們。--no-all 選項會從報告中隱藏不可建置的二進制檔和測試套件。
組裝相依項
對於每個 NativeBinarySpec,Gradle 將建立一個名為 assembleDependents${component.name}${binary.variant} 的工作,該工作組裝(編譯和連結)二進制檔及其所有相依二進制檔。
對於每個 NativeComponentSpec,Gradle 將建立一個名為 assembleDependents${component.name} 的工作,該工作組裝元件的所有二進制檔及其所有相依二進制檔。
例如,若要組裝 "operators" 元件的 "passing" flavor 的 "static" 程式庫二進制檔的相依項,您可以執行 assembleDependentsOperatorsPassingStaticLibrary 工作
範例:組裝取決於 operators 元件的 passing/static 二進制檔的元件
gradle assembleDependentsOperatorsPassingStaticLibrary --max-workers=1 的輸出> gradle assembleDependentsOperatorsPassingStaticLibrary --max-workers=1 > Task :compileOperatorsTestPassingCUnitExeOperatorsC > Task :operatorsTestCUnitLauncher > Task :compileOperatorsTestPassingCUnitExeOperatorsTestC > Task :compileOperatorsTestPassingCUnitExeOperatorsTestCunitLauncher > Task :linkOperatorsTestPassingCUnitExe > Task :operatorsTestPassingCUnitExe > Task :assembleDependentsOperatorsTestPassingCUnitExe > Task :compileOperatorsPassingStaticLibraryOperatorsC > Task :createOperatorsPassingStaticLibrary > Task :operatorsPassingStaticLibrary > Task :assembleDependentsOperatorsPassingStaticLibrary BUILD SUCCESSFUL in 0s 7 actionable tasks: 7 executed
在上面的輸出中,目標二進制檔以及取決於它的測試套件二進制檔都被組裝。
您也可以使用相應的元件工作(例如 assembleDependentsOperators)組裝元件的所有相依項(即其所有二進制檔/變體)。如果您有許多建置類型、flavor 和平台的組合,並且想要組裝所有這些組合,這會很有用。
建置相依項
對於每個 NativeBinarySpec,Gradle 將建立一個名為 buildDependents${component.name}${binary.variant} 的工作,該工作建置(編譯、連結和檢查)二進制檔及其所有相依二進制檔。
對於每個 NativeComponentSpec,Gradle 將建立一個名為 buildDependents${component.name} 的工作,該工作建置元件的所有二進制檔及其所有相依二進制檔。
例如,若要建置 "operators" 元件的 "passing" flavor 的 "static" 程式庫二進制檔的相依項,您可以執行 buildDependentsOperatorsPassingStaticLibrary 工作
範例:建置取決於 operators 元件的 passing/static 二進制檔的元件
gradle buildDependentsOperatorsPassingStaticLibrary --max-workers=1 的輸出> gradle buildDependentsOperatorsPassingStaticLibrary --max-workers=1 > Task :compileOperatorsTestPassingCUnitExeOperatorsC > Task :operatorsTestCUnitLauncher > Task :compileOperatorsTestPassingCUnitExeOperatorsTestC > Task :compileOperatorsTestPassingCUnitExeOperatorsTestCunitLauncher > Task :linkOperatorsTestPassingCUnitExe > Task :operatorsTestPassingCUnitExe > Task :installOperatorsTestPassingCUnitExe > Task :runOperatorsTestPassingCUnitExe > Task :checkOperatorsTestPassingCUnitExe > Task :buildDependentsOperatorsTestPassingCUnitExe > Task :compileOperatorsPassingStaticLibraryOperatorsC > Task :createOperatorsPassingStaticLibrary > Task :operatorsPassingStaticLibrary > Task :buildDependentsOperatorsPassingStaticLibrary BUILD SUCCESSFUL in 0s 9 actionable tasks: 9 executed
在上面的輸出中,目標二進制檔以及取決於它的測試套件二進制檔都被建置,並且測試套件已執行。
您也可以使用相應的元件工作(例如 buildDependentsOperators)建置元件的所有相依項(即其所有二進制檔/變體)。
工作
對於每個可以由建置產生的 NativeBinarySpec,都會建構一個單一的生命週期工作,可用於建立該二進制檔,以及一組其他工作,這些工作會執行編譯、連結或組裝二進制檔的實際工作。
${component.name}Executable-
- 元件類型
- 原生二進制檔類型
- 已建立二進制檔的位置
-
${project.layout.buildDirectory}/exe/${component.name}/${component.name}
${component.name}SharedLibrary-
- 元件類型
- 原生二進制檔類型
- 已建立二進制檔的位置
-
${project.layout.buildDirectory}/libs/${component.name}/shared/lib${component.name}.so
${component.name}StaticLibrary-
- 元件類型
- 原生二進制檔類型
- 已建立二進制檔的位置
-
${project.layout.buildDirectory}/libs/${component.name}/static/${component.name}.a
檢查工作
對於每個可以由建置產生的 NativeBinarySpec,都會建構一個單一的檢查工作,可用於組裝和檢查該二進制檔。
check${component.name}Executable-
- 元件類型
- 原生二進制檔類型
check${component.name}SharedLibrary-
- 元件類型
- 原生二進制檔類型
check${component.name}StaticLibrary-
- 元件類型
- 原生二進制檔類型
內建的 check 工作取決於專案中二進制檔的所有檢查工作。如果沒有 CUnit 或 GoogleTest 外掛,二進制檔檢查工作僅取決於組裝二進制檔的生命週期工作,請參閱 工作。
當應用 CUnit 或 GoogleTest 外掛時,執行元件測試套件的工作會自動連接到適當的檢查工作。
您也可以如下所示新增自訂檢查工作
範例:新增自訂檢查工作
plugins {
    id "cpp"
}
// You don't need to apply the plugin below if you're already using CUnit or GoogleTest support
apply plugin: TestingModelBasePlugin

tasks.register('myCustomCheck') {
    doLast {
        println 'Executing my custom check'
    }
}

model {
    components {
        hello(NativeLibrarySpec) {
            binaries.all {
                // Register our custom check task to all binaries of this component
                checkedBy $.tasks.myCustomCheck
            }
        }
    }
}
現在,執行 check 或 hello 二進制檔的任何檢查工作都將執行自訂檢查工作
範例:執行給定二進制檔的檢查
gradle checkHelloSharedLibrary 的輸出> gradle checkHelloSharedLibrary > Task :myCustomCheck Executing my custom check > Task :checkHelloSharedLibrary BUILD SUCCESSFUL in 0s 1 actionable task: 1 executed
使用共享程式庫
對於產生的每個可執行二進制檔,cpp 外掛提供一個 install${binary.name} 工作,該工作會建立可執行檔的開發安裝,以及它需要的共享程式庫。這允許您執行可執行檔,而無需將共享程式庫安裝在其最終位置。
找出更多關於您的專案資訊
Gradle 提供了一個報告,您可以從命令列執行該報告,以顯示有關您的專案產生的元件和二進制檔的一些詳細資訊。若要使用此報告,只需執行 gradle components。以下是在其中一個範例專案上執行此報告的範例
範例:元件報告
gradle components 的輸出> gradle components
> Task :components
------------------------------------------------------------
Root project 'cpp'
------------------------------------------------------------
Native library 'hello'
----------------------
Source sets
C++ source 'hello:cpp'
srcDir: src/hello/cpp
Binaries
Shared library 'hello:sharedLibrary'
build using task: :helloSharedLibrary
build type: build type 'debug'
flavor: flavor 'default'
target platform: platform 'current'
tool chain: Tool chain 'clang' (Clang)
shared library file: build/libs/hello/shared/libhello.dylib
Static library 'hello:staticLibrary'
build using task: :helloStaticLibrary
build type: build type 'debug'
flavor: flavor 'default'
target platform: platform 'current'
tool chain: Tool chain 'clang' (Clang)
static library file: build/libs/hello/static/libhello.a
Native executable 'main'
------------------------
Source sets
C++ source 'main:cpp'
srcDir: src/main/cpp
Binaries
Executable 'main:executable'
build using task: :mainExecutable
install using task: :installMainExecutable
build type: build type 'debug'
flavor: flavor 'default'
target platform: platform 'current'
tool chain: Tool chain 'clang' (Clang)
executable file: build/exe/main/main
Note: currently not all plugins register their components, so some components may not be visible here.
BUILD SUCCESSFUL in 0s
1 actionable task: 1 executed
語言支援
目前,Gradle 支援從下面列出的原始碼語言的任何組合建置原生軟體。原生二進制檔專案將包含一個或多個已命名的 FunctionalSourceSet 實例(例如 'main'、'test' 等),每個實例都可以包含 LanguageSourceSet,其中包含原始碼檔案,每個語言一個。
-
C
-
C++
-
Objective-C
-
Objective-C++
-
組合語言
-
Windows 資源
C++ 原始碼
C++ 語言支援由 'cpp' 外掛提供。
範例:'cpp' 外掛
plugins {
    id 'cpp'
}
要包含在原生二進制檔中的 C++ 原始碼透過 CppSourceSet 提供,該 CppSourceSet 定義一組 C++ 原始碼檔案,以及可選的一組匯出的標頭檔(對於程式庫)。預設情況下,對於任何已命名的元件,CppSourceSet 包含 src/${name}/cpp 中的 .cpp 原始碼檔案,以及 src/${name}/headers 中的標頭檔。
雖然 cpp 外掛為每個 CppSourceSet 定義了這些預設位置,但可以擴展或覆寫這些預設位置,以允許不同的專案佈局。
範例:C++ 原始碼集
sources {
    cpp {
        source {
            srcDir "src/source"
            include "**/*.cpp"
        }
    }
}
對於名為 'main' 的程式庫,src/main/headers 中的標頭檔被視為「公開」或「匯出」的標頭。不應匯出的標頭檔應放置在 src/main/cpp 目錄內(但請注意,應始終以相對於包含它們的檔案的方式引用此類標頭檔)。
C 原始碼
C 語言支援由 'c' 外掛提供。
範例:'c' 外掛
plugins {
    id 'c'
}
要包含在原生二進制檔中的 C 原始碼透過 CSourceSet 提供,該 CSourceSet 定義一組 C 原始碼檔案,以及可選的一組匯出的標頭檔(對於程式庫)。預設情況下,對於任何已命名的元件,CSourceSet 包含 src/${name}/c 中的 .c 原始碼檔案,以及 src/${name}/headers 中的標頭檔。
雖然 c 外掛為每個 CSourceSet 定義了這些預設位置,但可以擴展或覆寫這些預設位置,以允許不同的專案佈局。
範例:C 原始碼集
sources {
    c {
        source {
            srcDir "src/source"
            include "**/*.c"
        }
        exportedHeaders {
            srcDir "src/include"
        }
    }
}
對於名為 'main' 的程式庫,src/main/headers 中的標頭檔被視為「公開」或「匯出」的標頭。不應匯出的標頭檔應放置在 src/main/c 目錄內(但請注意,應始終以相對於包含它們的檔案的方式引用此類標頭檔)。
組譯器原始碼
組合語言支援由 'assembler' 外掛提供。
範例:'assembler' 外掛
plugins {
    id 'assembler'
}
要包含在原生二進制檔中的組譯器原始碼透過 AssemblerSourceSet 提供,該 AssemblerSourceSet 定義一組組譯器原始碼檔案。預設情況下,對於任何已命名的元件,AssemblerSourceSet 包含 src/${name}/asm 下的 .s 原始碼檔案。
Objective-C 原始碼
Objective-C 語言支援由 'objective-c' 外掛提供。
範例:'objective-c' 外掛
plugins {
    id 'objective-c'
}
要包含在原生二進制檔中的 Objective-C 原始碼透過 ObjectiveCSourceSet 提供,該 ObjectiveCSourceSet 定義一組 Objective-C 原始碼檔案。預設情況下,對於任何已命名的元件,ObjectiveCSourceSet 包含 src/${name}/objectiveC 下的 .m 原始碼檔案。
Objective-C++ 原始碼
Objective-C++ 語言支援由 'objective-cpp' 外掛提供。
範例:'objective-cpp' 外掛
plugins {
    id 'objective-cpp'
}
要包含在原生二進制檔中的 Objective-C++ 原始碼透過 ObjectiveCppSourceSet 提供,該 ObjectiveCppSourceSet 定義一組 Objective-C++ 原始碼檔案。預設情況下,對於任何已命名的元件,ObjectiveCppSourceSet 包含 src/${name}/objectiveCpp 下的 .mm 原始碼檔案。
配置編譯器、組譯器和連結器
要產生的每個二進制檔都與一組編譯器和連結器設定相關聯,其中包括命令列引數以及巨集定義。這些設定可以應用於所有二進制檔、個別二進制檔,或根據某些條件選擇性地應用於一組二進制檔。
範例:應用於所有二進制檔的設定
model {
    binaries {
        all {
            // Define a preprocessor macro for every binary
            cppCompiler.define "NDEBUG"

            // Define toolchain-specific compiler and linker options
            if (toolChain in Gcc) {
                cppCompiler.args "-O2", "-fno-access-control"
                linker.args "-Xlinker", "-S"
            }
            if (toolChain in VisualCpp) {
                cppCompiler.args "/Zi"
                linker.args "/DEBUG"
            }
        }
    }
}
每個二進制檔都與特定的 NativeToolChain 相關聯,允許根據此值定位設定。
將設定應用於特定類型的所有二進制檔很容易
範例:應用於所有共享程式庫的設定
// For any shared library binaries built with Visual C++,
// define the DLL_EXPORT macro
model {
    binaries {
        withType(SharedLibraryBinarySpec) {
            if (toolChain in VisualCpp) {
                cCompiler.args "/Zi"
                cCompiler.define "DLL_EXPORT"
            }
        }
    }
}
此外,可以指定應用於為特定 executable 或 library 元件產生的所有二進制檔的設定
範例:應用於為 'main' 可執行元件產生的所有二進制檔的設定
model {
    components {
        main(NativeExecutableSpec) {
            targetPlatform "x86"
            binaries.all {
                if (toolChain in VisualCpp) {
                    sources {
                        platformAsm(AssemblerSourceSet) {
                            source.srcDir "src/main/asm_i386_masm"
                        }
                    }
                    assembler.args "/Zi"
                } else {
                    sources {
                        platformAsm(AssemblerSourceSet) {
                            source.srcDir "src/main/asm_i386_gcc"
                        }
                    }
                    assembler.args "-g"
                }
            }
        }
    }
}
上面的範例將提供的配置應用於所有建置的 executable 二進制檔。
同樣地,可以指定設定以定位元件的二進制檔,這些二進制檔屬於特定類型:例如,main 程式庫元件的所有共享程式庫。
範例:僅應用於為 'main' 程式庫元件產生的共享程式庫的設定
model {
    components {
        main(NativeLibrarySpec) {
            binaries.withType(SharedLibraryBinarySpec) {
                // Define a preprocessor macro that only applies to shared libraries
                cppCompiler.define "DLL_EXPORT"
            }
        }
    }
}
Windows 資源
當使用 VisualCpp 工具鏈時,Gradle 能夠編譯 Windows 資源 (rc) 檔,並將它們連結到原生二進位檔中。此功能由 'windows-resources' 外掛程式提供。
範例:'windows-resources' 外掛程式
plugins {
    id 'windows-resources'
}
要包含在原生二進位檔中的 Windows 資源,是透過 WindowsResourceSet 提供,它定義了一組 Windows 資源原始檔。預設情況下,對於任何已命名的組件,WindowsResourceSet 包含 src/${name}/rc 下的 .rc 原始檔。
與其他來源類型一樣,您可以設定應包含在二進位檔中的 Windows 資源的位置。
範例:設定 Windows 資源來源的位置
sources {
    rc {
        source {
            srcDirs "src/hello/rc"
        }
        exportedHeaders {
            srcDirs "src/hello/headers"
        }
    }
}
您可以透過提供僅有 Windows 資源來源而沒有其他語言來源的方式,來建構僅限資源的程式庫,並適當地設定連結器。
範例:建構僅限資源的 dll
model {
    components {
        helloRes(NativeLibrarySpec) {
            binaries.all {
                rcCompiler.args "/v"
                linker.args "/noentry", "/machine:x86"
            }
            sources {
                rc {
                    source {
                        srcDirs "src/hello/rc"
                    }
                    exportedHeaders {
                        srcDirs "src/hello/headers"
                    }
                }
            }
        }
    }
}上面的範例也示範了將額外的命令列引數傳遞給資源編譯器的方式。rcCompiler 擴充功能是 PreprocessingTool 類型。
程式庫相依性
原生組件的相依性是匯出標頭檔的二進位程式庫。標頭檔在編譯期間使用,而編譯後的二進位相依性在連結和執行期間使用。標頭檔應組織到子目錄中,以防止常見名稱標頭的衝突。例如,如果您的 mylib 專案有一個 logging.h 標頭,如果您將其包含為 "mylib/logging.h" 而不是 "logging.h",則可以降低使用錯誤標頭的可能性。
同一專案內的相依性
一組來源可能相依於同一專案內另一個二進位組件提供的標頭檔。一個常見的例子是,原生可執行組件使用由單獨的原生程式庫組件提供的函式。
這種程式庫相依性可以添加到與 executable 組件關聯的來源集。
範例:向來源集提供程式庫相依性
sources {
    cpp {
        lib library: "hello"
    }
}
或者,程式庫相依性可以直接提供給 executable 的 NativeExecutableBinarySpec。
範例:向二進位檔提供程式庫相依性
model {
    components {
        hello(NativeLibrarySpec) {
            sources {
                c {
                    source {
                        srcDir "src/source"
                        include "**/*.c"
                    }
                    exportedHeaders {
                        srcDir "src/include"
                    }
                }
            }
        }
        main(NativeExecutableSpec) {
            sources {
                cpp {
                    source {
                        srcDir "src/source"
                        include "**/*.cpp"
                    }
                }
            }
            binaries.all {
                // Each executable binary produced uses the 'hello' static library binary
                lib library: 'hello', linkage: 'static'
            }
        }
    }
}
專案相依性
對於在不同 Gradle 專案中產生的組件,其標記法是相似的。
範例:宣告專案相依性
plugins {
    id 'cpp'
}

model {
    components {
        main(NativeLibrarySpec)
    }

    // For any shared library binaries built with Visual C++,
    // define the DLL_EXPORT macro
    binaries {
        withType(SharedLibraryBinarySpec) {
            if (toolChain in VisualCpp) {
                cppCompiler.define "DLL_EXPORT"
            }
        }
    }
}plugins {
id 'cpp'
}
model {
components {
main(NativeExecutableSpec) {
sources {
cpp {
lib project: ':lib', library: 'main'
}
}
}
}
}預編譯標頭
預編譯標頭是一種效能最佳化,可減少多次編譯廣泛使用的標頭的成本。此功能預編譯標頭,以便在編譯每個原始檔時可以重複使用已編譯的物件檔,而不是每次都重新編譯標頭。此支援適用於 C、C++、Objective-C 和 Objective-C++ 建置。
若要設定預編譯標頭,首先需要定義一個標頭檔,其中包含應預編譯的所有標頭。它必須指定為每個應使用預編譯標頭的原始檔中的第一個包含的標頭。假設此標頭檔及其包含的任何標頭都使用標頭保護,以便它們可以以等冪方式包含。如果在標頭檔中未使用標頭保護,則標頭可能會被編譯多次,並可能導致建置失敗。
範例:建立預編譯標頭檔
#ifndef PCH_H
#define PCH_H
#include <iostream>
#include "hello.h"
#endif
範例:在原始檔中包含預編譯標頭檔
#include "pch.h"

void LIB_FUNC Greeter::hello () {
    std::cout << "Hello world!" << std::endl;
}
預編譯標頭是在來源集上指定的。在給定的來源集上只能指定一個預編譯標頭檔,並且將應用於所有將其宣告為第一個包含項的原始檔。如果原始檔未將此標頭檔作為第一個標頭包含,則該檔案將以正常方式編譯(不使用預編譯標頭物件檔)。提供的字串應與原始檔的 "#include" 指令中使用的字串相同。
範例:設定預編譯標頭
model {
    components {
        hello(NativeLibrarySpec) {
            sources {
                cpp {
                    preCompiledHeader "pch.h"
                }
            }
        }
    }
}
對於所有使用預編譯標頭的檔案,必須以相同的方式包含它。通常,這表示標頭檔應存在於來源集 "headers" 目錄中,或存在於編譯器包含路徑中包含的目錄中。
原生二進位變體
對於定義的每個可執行檔或程式庫,Gradle 能夠建置許多不同的原生二進位變體。不同變體的範例包括偵錯與發行二進位檔、32 位元與 64 位元二進位檔,以及使用不同自訂前處理器旗標產生的二進位檔。
Gradle 產生的二進位檔可以根據建置類型、平台和風味來區分。對於每個「變體維度」,可以指定一組可用的值,以及針對一個、某些或所有這些維度的每個組件。例如,外掛程式可能會定義一系列支援的平台,但您可能會選擇僅針對特定組件的 Windows-x86。
建置類型
建置類型決定了二進位檔的各種非功能性方面,例如是否包含偵錯資訊,或二進位檔的編譯最佳化層級。典型的建置類型是「debug」和「release」,但專案可以自由定義任何一組建置類型。
範例:定義建置類型
model {
    buildTypes {
        debug
        release
    }
}
如果專案中未定義任何建置類型,則會新增一個名為「debug」的單一預設建置類型。
對於建置類型,Gradle 專案通常會為每個工具鏈定義一組編譯器/連結器旗標。
範例:設定偵錯二進位檔
model {
    binaries {
        all {
            if (toolChain in Gcc && buildType == buildTypes.debug) {
                cppCompiler.args "-g"
            }
            if (toolChain in VisualCpp && buildType == buildTypes.debug) {
                cppCompiler.args '/Zi'
                cppCompiler.define 'DEBUG'
                linker.args '/DEBUG'
            }
        }
    }
}| 在這個階段,完全由建置腳本來設定每個建置類型的相關編譯器/連結器旗標。未來版本的 Gradle 將自動包含任何「debug」建置類型的適當偵錯旗標,並且也可能意識到各種最佳化層級。 |
平台
可執行檔或程式庫可以建置為在不同的作業系統和 CPU 架構上執行,每個平台都會產生一個變體。Gradle 將每個作業系統/架構組合定義為 NativePlatform,並且專案可以定義任意數量的平台。如果專案中未定義任何平台,則會新增一個名為「current」的單一預設平台。
|
目前, |
範例:定義平台
model {
    platforms {
        x86 {
            architecture "x86"
        }
        x64 {
            architecture "x86_64"
        }
        itanium {
            architecture "ia-64"
        }
    }
}
對於給定的變體,Gradle 將嘗試找到一個能夠為目標平台建置的 NativeToolChain。將按照定義的順序搜尋可用的工具鏈。請參閱下面的工具鏈章節以取得更多詳細資訊。
風味
每個組件都可以有一組已命名的風味,並且可以為每種風味產生單獨的二進位變體。雖然建置類型和目標平台變體維度在 Gradle 中具有已定義的含義,但每個專案都可以自由定義任意數量的風味,並以任何方式對它們應用含義。
組件風味的範例可能區分組件的「demo」、「paid」和「enterprise」版本,其中使用相同的來源集來產生具有不同功能的二進位檔。
範例:定義風味
model {
    flavors {
        english
        french
    }
    components {
        hello(NativeLibrarySpec) {
            binaries.all {
                if (flavor == flavors.french) {
                    cppCompiler.define "FRENCH"
                }
            }
        }
    }
}
在上面的範例中,定義了一個具有「english」和「french」風味的程式庫。在編譯「french」變體時,定義了一個單獨的巨集,這會導致產生不同的二進位檔。
如果未為組件定義風味,則使用名為「default」的單一預設風味。
為組件選擇建置類型、平台和風味
對於預設組件,Gradle 將嘗試為專案定義的每個buildType 和 flavor 組合建立原生二進位變體。可以透過指定 targetBuildTypes 和/或 targetFlavors 集合,在每個組件的基礎上覆寫此設定。預設情況下,Gradle 將為預設平台建置,請參閱上面,除非透過指定一組 targetPlatforms 在每個組件的基礎上明確指定。
範例:將組件定位在特定平台上
model {
    components {
        hello(NativeLibrarySpec) {
            targetPlatform "x86"
            targetPlatform "x64"
        }
        main(NativeExecutableSpec) {
            targetPlatform "x86"
            targetPlatform "x64"
            sources {
                cpp.lib library: 'hello', linkage: 'static'
            }
        }
    }
}在這裡您可以看到,TargetedNativeComponent.targetPlatform(java.lang.String) 方法用於指定應為名為 main 的 NativeExecutableSpec 建置的平台。
建置所有可能的變體
當為組件定義一組建置類型、目標平台和風味時,將為這些的每種可能組合建立一個 NativeBinarySpec 模型元素。但是,在許多情況下,不可能建置特定的變體,可能是因為沒有可用的工具鏈來為特定平台建置。
如果由於任何原因無法建置二進位變體,則與該變體關聯的 NativeBinarySpec 將不可buildable。可以使用此屬性來建立任務,以在特定機器上產生所有可能的變體。
範例:建置所有可能的變體
model {
    tasks {
        buildAllExecutables(Task) {
            dependsOn $.binaries.findAll { it.buildable }
        }
    }
}
工具鏈
單個建置可以使用不同的工具鏈來為不同的平台建置變體。為此,核心「native-binary」外掛程式將嘗試定位並提供支援的工具鏈。但是,也可以明確定義專案的工具鏈集,從而允許設定其他交叉編譯器,以及允許指定安裝目錄。
範例:定義工具鏈
model {
    toolChains {
        visualCpp(VisualCpp) {
            // Specify the installDir if Visual Studio cannot be located
            // installDir "C:/Apps/Microsoft Visual Studio 10.0"
        }
        gcc(Gcc) {
            // Uncomment to use a GCC install that is not in the PATH
            // path "/usr/bin/gcc"
        }
        clang(Clang)
    }
}
每個工具鏈實作都允許一定程度的設定(請參閱 API 文件以取得更多詳細資訊)。
使用工具鏈
沒有必要或可能指定應使用的工具鏈來進行建置。對於給定的變體,Gradle 將嘗試定位能夠為目標平台建置的 NativeToolChain。將按照定義的順序搜尋可用的工具鏈。
當平台未定義架構或作業系統時,將假定工具鏈的預設目標。因此,如果平台未定義 operatingSystem 的值,Gradle 將找到第一個可用的工具鏈,該工具鏈可以為指定的 architecture 建置。 |
核心 Gradle 工具鏈能夠立即針對以下架構。在每種情況下,工具鏈都將針對目前的作業系統。請參閱下一節,以取得有關為其他作業系統進行交叉編譯的資訊。
| 工具鏈 | 架構 |
|---|---|
GCC |
x86、x86_64、arm64 (僅限 macOS 和 linux) |
Clang |
x86、x86_64、arm64 (僅限 macOS 和 linux) |
Visual C++ |
x86、x86_64、ia-64 |
因此,對於在 linux 上執行的 GCC,支援的目標平台為「linux/x86」和「linux/x86_64」。對於在 Windows 上透過 Cygwin 執行的 GCC,支援平台「windows/x86」和「windows/x86_64」。 (Cygwin POSIX 執行階段尚未作為平台的一部分建模,但將在未來建模。)
如果未為專案定義任何目標平台,則所有二進位檔都將建置為針對名為「current」的預設平台。此預設平台未指定任何 architecture 或 operatingSystem 值,因此使用第一個可用工具鏈的預設值。
Gradle 提供了一個掛鉤,允許建置作者控制傳遞給工具鏈可執行檔的確切引數集。這使建置作者可以解決 Gradle 中的任何限制或 Gradle 所做的假設。引數掛鉤應被視為「最後手段」機制,優先考慮真正建模底層網域。
範例:重新設定工具引數
model {
    toolChains {
        visualCpp(VisualCpp) {
            eachPlatform {
                cppCompiler.withArguments { args ->
                    args << "-DFRENCH"
                }
            }
        }
        clang(Clang) {
            eachPlatform {
                cCompiler.withArguments { args ->
                    Collections.replaceAll(args, "CUSTOM", "-DFRENCH")
                }
                linker.withArguments { args ->
                    args.remove "CUSTOM"
                }
                staticLibArchiver.withArguments { args ->
                    args.remove "CUSTOM"
                }
            }
        }
    }
}範例:定義目標平台
model {
    toolChains {
        gcc(Gcc) {
            target("arm"){
                cppCompiler.withArguments { args ->
                    args << "-m32"
                }
                linker.withArguments { args ->
                    args << "-m32"
                }
            }
            target("sparc")
        }
    }
    platforms {
        arm {
            architecture "arm"
        }
        sparc {
            architecture "sparc"
        }
    }
    components {
        main(NativeExecutableSpec) {
            targetPlatform "arm"
            targetPlatform "sparc"
        }
    }
}
Visual Studio IDE 整合
Gradle 能夠為您的建置中定義的原生組件產生 Visual Studio 專案和方案檔。此功能由 visual-studio 外掛程式新增。對於多專案建置,具有原生組件的所有專案(以及根專案)都應套用此外掛程式。
當 visual-studio 外掛程式應用於根專案時,會建立一個名為 visualStudio 的任務,該任務將產生一個包含建置中所有組件的 Visual Studio 方案檔。此方案將包含每個組件的 Visual Studio 專案,以及設定每個組件以使用 Gradle 進行建置。
當專案是根專案時,visual-studio 外掛程式也會建立一個名為 openVisualStudio 的任務。此任務會產生 Visual Studio 方案,然後在 Visual Studio 中開啟方案。這表示您可以簡單地從根專案執行 gradlew openVisualStudio,以一個方便的步驟產生並開啟 Visual Studio 方案。
可以透過 visualStudio 擴充功能提供的 API 掛鉤修改產生的 Visual Studio 檔案的內容。請查看「visual-studio」範例,或參閱 API 文件中的 VisualStudioExtension.getProjects() 和 VisualStudioRootExtension.getSolution() 以取得更多詳細資訊。
CUnit 支援
Gradle cunit 外掛程式提供在您的原生二進位專案中編譯和執行 CUnit 測試的支援。對於專案中定義的每個 NativeExecutableSpec 和 NativeLibrarySpec,Gradle 將建立一個相符的 CUnitTestSuiteSpec 組件,名為 ${component.name}Test。
CUnit 來源
Gradle 將為專案中的每個 CUnitTestSuiteSpec 組件建立一個名為「cunit」的 CSourceSet。此來源集應包含受測組件的 cunit 測試檔。原始檔可以位於傳統位置 (src/${component.name}Test/cunit) 或像任何其他來源集一樣設定。
Gradle 初始化 CUnit 測試註冊表並執行測試,利用一些產生的 CUnit 啟動器來源。Gradle 將期望並呼叫簽名為 void gradle_cunit_register() 的函式,您可以使用該函式來設定要執行的實際 CUnit 套件和測試。
範例:註冊 CUnit 測試
#include <CUnit/Basic.h>
#include "gradle_cunit_register.h"
#include "test_operators.h"

int suite_init(void) {
    return 0;
}

int suite_clean(void) {
    return 0;
}

void gradle_cunit_register() {
    CU_pSuite pSuiteMath = CU_add_suite("operator tests", suite_init, suite_clean);
    CU_add_test(pSuiteMath, "test_plus", test_plus);
    CU_add_test(pSuiteMath, "test_minus", test_minus);
}
由於此機制,您的 CUnit 來源可能不包含 main 方法,因為這將與 Gradle 提供的方法衝突。 |
建置 CUnit 可執行檔
CUnitTestSuiteSpec 組件具有關聯的 NativeExecutableSpec 或 NativeLibrarySpec 組件。對於為主組件設定的每個 NativeBinarySpec,將在測試套件組件上設定一個相符的 CUnitTestSuiteBinarySpec。這些測試套件二進位檔可以像任何其他二進位執行個體一樣設定。
範例:設定 CUnit 測試
model {
    binaries {
        withType(CUnitTestSuiteBinarySpec) {
            lib library: "cunit", linkage: "static"

            if (flavor == flavors.failing) {
                cCompiler.define "PLUS_BROKEN"
            }
        }
    }
}| 您的專案提供的 CUnit 來源和產生的啟動器都需要核心 CUnit 標頭和程式庫。目前,必須由您的專案為每個 CUnitTestSuiteBinarySpec 提供此程式庫相依性。 |
執行 CUnit 測試
對於每個 CUnitTestSuiteBinarySpec,Gradle 將建立一個任務來執行此二進位檔,這將執行所有已註冊的 CUnit 測試。測試結果將在 ${build.dir}/test-results 目錄中找到。
範例:執行 CUnit 測試
plugins {
    id 'c'
    id 'cunit-test-suite'
}

model {
    flavors {
        passing
        failing
    }
    platforms {
        x86 {
            if (operatingSystem.macOsX) {
                architecture "x64"
            } else {
                architecture "x86"
            }
        }
    }
    repositories {
        libs(PrebuiltLibraries) {
            cunit {
                headers.srcDir "libs/cunit/2.1-2/include"
                binaries.withType(StaticLibraryBinary) {
                    staticLibraryFile =
                        file("libs/cunit/2.1-2/lib/" +
                             findCUnitLibForPlatform(targetPlatform))
                }
            }
        }
    }
    components {
        operators(NativeLibrarySpec) {
            targetPlatform "x86"
        }
    }
    testSuites {
        operatorsTest(CUnitTestSuiteSpec) {
            testing $.components.operators
        }
    }
}
model {
    binaries {
        withType(CUnitTestSuiteBinarySpec) {
            lib library: "cunit", linkage: "static"

            if (flavor == flavors.failing) {
                cCompiler.define "PLUS_BROKEN"
            }
        }
    }
}
gradle -q runOperatorsTestFailingCUnitExe 的輸出> gradle -q runOperatorsTestFailingCUnitExe There were test failures: 1. /home/user/gradle/samples/src/operatorsTest/c/test_plus.c:6 - plus(0, -2) == -2 2. /home/user/gradle/samples/src/operatorsTest/c/test_plus.c:7 - plus(2, 2) == 4 FAILURE: Build failed with an exception. * What went wrong: Execution failed for task ':runOperatorsTestFailingCUnitExe'. > There were failing tests. See the results at: file:///home/user/gradle/samples/build/test-results/operatorsTest/failing/ * Try: > Run with --stacktrace option to get the stack trace. > Run with --info or --debug option to get more log output. > Run with --scan to get full insights. > Get more help at https://help.gradle.org. BUILD FAILED in 0s
|
目前對 CUnit 的支援相當基本。未來整合的計劃包括
|
GoogleTest 支援
Gradle google-test 外掛程式提供在您的原生二進位專案中編譯和執行 GoogleTest 測試的支援。對於專案中定義的每個 NativeExecutableSpec 和 NativeLibrarySpec,Gradle 將建立一個相符的 GoogleTestTestSuiteSpec 組件,名為 ${component.name}Test。
GoogleTest 來源
Gradle 將為專案中的每個 GoogleTestTestSuiteSpec 組件建立一個名為「cpp」的 CppSourceSet。此來源集應包含受測組件的 GoogleTest 測試檔。原始檔可以位於傳統位置 (src/${component.name}Test/cpp) 或像任何其他來源集一樣設定。
建置 GoogleTest 可執行檔
GoogleTestTestSuiteSpec 組件具有關聯的 NativeExecutableSpec 或 NativeLibrarySpec 組件。對於為主組件設定的每個 NativeBinarySpec,將在測試套件組件上設定一個相符的 GoogleTestTestSuiteBinarySpec。這些測試套件二進位檔可以像任何其他二進位執行個體一樣設定。
範例:註冊 GoogleTest 測試
model {
    binaries {
        withType(GoogleTestTestSuiteBinarySpec) {
            lib library: "googleTest", linkage: "static"

            if (flavor == flavors.failing) {
                cppCompiler.define "PLUS_BROKEN"
            }

            if (targetPlatform.operatingSystem.linux) {
                cppCompiler.args '-pthread'
                linker.args '-pthread'

                if (toolChain instanceof Gcc || toolChain instanceof Clang) {
                    // Use C++03 with the old ABIs, as this is what the googletest binaries were built with
                    cppCompiler.args '-std=c++03', '-D_GLIBCXX_USE_CXX11_ABI=0'
                    linker.args '-std=c++03'
                }
            }
        }
    }
}| 您的專案提供的 GoogleTest 來源需要核心 GoogleTest 標頭和程式庫。目前,必須由您的專案為每個 GoogleTestTestSuiteBinarySpec 提供此程式庫相依性。 |
執行 GoogleTest 測試
對於每個 GoogleTestTestSuiteBinarySpec,Gradle 將建立一個任務來執行此二進位檔,這將執行所有已註冊的 GoogleTest 測試。測試結果將在 ${build.dir}/test-results 目錄中找到。
|
目前對 GoogleTest 的支援相當基本。未來整合的計劃包括
|